Monarch Model Validator User Manual
This instruction manual is designed to be a step-by-step guide for users of the ArcGIS Collector app as a tool for validating habitat suitability. The Collector app may be used on any smartphone. This manual requires that you abide by the agreed upon disclosure available at at this link.
This manual broken into two parts:
- Steps completed outside the Collector app
- Steps completed within the Collector app
Steps completed outside Collector:
This application requires you to take photos that are geotagged (i.e., have location coordinates embedded in the file) as well as the “appropriate” orientation. The survey you will be completing within the Collector app will ask whether you uploaded all directional photos. This means you should take four directional photos: North, East, South, and West. This should be done with the camera capturing the area at both the Local level (within 5 yards/meters of your feet) and Landscape level (approximately 50 yards/meters, horizon photos). While there may be other ways to accomplish these tasks, this manual will instruct you on two equivalent methods. 1) Manually orienting geotagged photos, OR 2) Using Solocator app.
Method 1: Manually orienting geotagged photos
- Turn on location services for your photos (iPhone)
- Open Settings on your phone
- Privacy
- Location Services
- Camera
- Select While Using the App
- Turn on location services for your photos (Android)
- Open the camera app on your phone
- Select Settings
- Location Tag
- Select the On button
- Once you have made your way to the validation site (to be discussed later), take directional Local photos (photograph the area within 5 yards/meters of your feet)
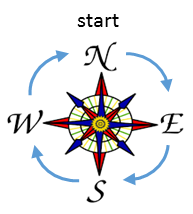
- Open your Compass app and orient yourself so you are facing North
- Take your first Local photo (North)
- Turn 90 degrees clockwise and take your second Local photo (East).
- Turn 90 degrees clockwise and take your third Local photo (South).
- Turn 90 degrees clockwise and take your fourth Local photo (West).
- Take directional Landscape photos (photograph the area between your location and 50 yards/meters away)
- Open your Compass app and orient yourself so you are facing North
- Take your first Landscape photo (North).
- Turn 90 degrees clockwise and take your second Landscape photo (East).
- Turn 90 degrees clockwise and take your third Landscape photo (South).
- Turn 90 degrees clockwise and take your fourth Landscape photo (West).
- The ordering is important for these photos, so you can label them appropriately within the survey. The first photo taken is the Local North photo while the eighth photo taken is the Landscape West photo.
Method 2: Using Solocator to geotag your photos
- Open the App store and buy ($0.99)

- This app takes a picture that includes: compass reading, elevation, bearing, latitude and longitude, and date and time.
- Open the Solocator app
- Once you have made your way to the validation site (to be discussed later), take directional Local photos (photograph the area within 5 yards/meters of your feet)
- Open your Compass app and orient yourself so your facing North
- Take your first Local photo (North).
- Turn 90 degrees clockwise and take your second Local photo (East).
- Turn 90 degrees clockwise and take your third Local photo (South).
- Turn 90 degrees clockwise and take your fourth Local photo (West).
- Take directional Landscape photos (photograph the area between your location 50 yards/meters away)
- Open your Compass app and orient yourself so you are facing North
- Take your first Landscape photo (North).
- Turn 90 degrees clockwise and take your second Landscape photo (East).
- Turn 90 degrees clockwise and take your third Landscape photo (South).
- Turn 90 degrees clockwise and take your fourth Landscape photo (West).
- Once you have made your way to the validation site (to be discussed later), take directional Local photos (photograph the area within 5 yards/meters of your feet)
- The ordering is important for these photos, so you can label them appropriately within the survey. The first photo taken is the Local North photo while the eighth photo taken is the Landscape West photo.
Steps within Collector:
- Navigate to the app and download ArcGIS Collector

- Open the application
- Sign into ArcGIS Online using the provided credentials. These are available on the app web page (https://umaine.edu/mainecoopunit/). Using this login and password indicate that you agree to the Terms of Use.
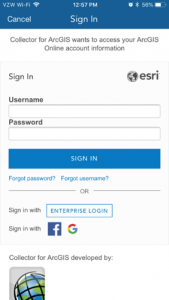
- Sign into ArcGIS Online using the provided credentials. These are available on the app web page (https://umaine.edu/mainecoopunit/). Using this login and password indicate that you agree to the Terms of Use.
- The following screen is a Launch screen. Before you begin collecting, you need to adjust your settings.
- Select

- Select Settings
- Collection Settings
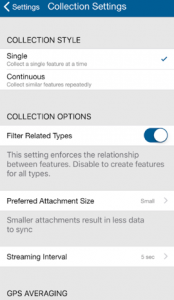
- Preferred Attachment Size
- Select Small
- Under GPS Averaging
- Turn On Average Locations
- Set Number of Locations to 5
- Return to the Launch screen by selecting

- Selecting Done will return you to the Launch screen
- Select
- Select the Map labeled “Monarch Butterfly Project”
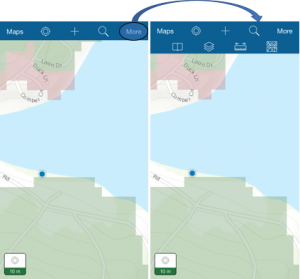
- This will be the main screen that you will be using during this application. The app will zoom you in to the default extent of the first layer in the list of available layers, which is the model layer to be validated.
Buttons
![]() – press to return to the Launch screen
– press to return to the Launch screen
![]() – press to zoom to your location (toggle to turn the current location on and off)
– press to zoom to your location (toggle to turn the current location on and off)
![]() – press to Start Collecting (you will select a layer here)
– press to Start Collecting (you will select a layer here)
![]() – press to search locations (by entering a location or name/number)
– press to search locations (by entering a location or name/number)
![]() – press to open bookmarks, i.e., saved locations or default map extent
– press to open bookmarks, i.e., saved locations or default map extent
![]() – press to adjust the layers displayed on the map (toggle on and off); the layers available to you are:
– press to adjust the layers displayed on the map (toggle on and off); the layers available to you are:
- Habitat Description: a point layer identified by the UMaine icon. This layer should be used as a land cover category reference.
- Sites to Visit: a point layer identified by the pin icon. These points identify the sites that need to be visited and then validated.
- Site Evaluation Survey: a point layer with a transparent icon. This layer is the primary survey layer.
- Evaluated Sites: a point layer identified by the checkmark icon. This layer is a post-survey layer used to identify validation sites that already have been visited.
![]() – press to open measurement tool (potentially used to measure distance from current location to a validation point)
– press to open measurement tool (potentially used to measure distance from current location to a validation point)
![]() – press to choose new basemap (e.g., imagery, street map, or topographic map displayed in the background/under the model to be validated)
– press to choose new basemap (e.g., imagery, street map, or topographic map displayed in the background/under the model to be validated)
- Start Collecting. This process will require you to complete two surveys. You should first complete the Site Evaluation Survey, followed by the Evaluated Sites survey.
- Make your way to a validation site of your choosing. These locations can be found on the Sites to Visit layer (select the “+” symbol to find the layer options). Each validation site has a unique location ID, which you will need to reference during the Site Evaluation Survey. You can display the point layer by turning on the Sites to Visit layer by selecting “more” and then the “stack of maps” icon.
- Once you are at or near the validation site, follow the steps below to complete the Site Evaluation Survey.
- Press
 , this will zoom the map to your location.
 - Press
 to begin the survey.
 - Choose the Site Evaluation Survey.
- Fill out the survey to the best of your ability. Some of the questions require you to make approximations (e.g., percentage estimates of habitat types). Just do your best.
- Uploading the photos. Please follow the above procedure while taking both the Local and Landscape directional photos. Choose the camera buttonin the Site Evaluation Survey part of the Collector app which will take you to a screen to select photos to upload.
- Upload the photos in order, i.e., the first photo uploaded should be the Local North photo while the final directional photo should be the Landscape West photo. After each photo is uploaded please click on the photo and Rename with the appropriate name. Example: name the Local North photo “Local-N” or “Local North”.
- Please confirm that you have uploaded all the directional photos by completing the survey questions: “Local photos:” and “Landscape photos”.
- If there are any notable features at this site, i.e., butterflies or other features, please photograph and then name the photo accordingly.
- Submit the Site Evaluation Survey.
- Press
- Follow the steps below to complete the Evaluated Sites
- Press , this will zoom the map to your location.
- Press to begin the survey.
- Choose the Evaluated Sites.
- Confirm that you have visited the validation site.
- Submit the Evaluated Sites.
- Once you have submitted this survey, you should see a large “Check Mark” icon appear at your location.
- If you are willing to share your e-mail address, please send an e-mail to monarch-model-group@maine.edu. Tell us the points you visited and for which you completed a questionnaire, and your preferred contact information.
- Thank you for Collecting! Please feel free to Collect at other validation sites.