Navigation
Outdoor navigation skills are important, especially in wilderness settings, in order to keep yourself safe and avoid getting lost. A GPS or navigation app on your phone can be useful, but a map and compass are reliable tools when you’re adventuring outside. Knowing how to read a map and compass can build your sense of confidence and help you navigate unfamiliar terrain. These skills may be crucial in unpredictable situations and practicing them will improve your overall sense of direction and familiarity with the wilderness.
Symbols or pictures are drawn on the map to represent a land feature or point of interest. They often look like what they are supposed to represent (such as a triangle for a mountain or a curved line for a river).
The symbols can be found in an atlas at the beginning (usually titled under “Key” or “Legend”).
These are the common symbols that can be found on trail maps. For more examples of symbology, this website provides many: https://bit.ly/3GZZyxZ.
A compass bearing (sometimes called an azimuth) is an angle measurement between a given point and north on the compass. This bearing provides a line showing the direction of travel to reach the given point you have taken a bearing of.
To determine the direction of travel:
- Draw a bearing line between points, and align the compass edge along it
- Turn the compass bezel so it aligns with any longitude line (North-South line)
- Pick up the compass and read the TRUE NORTH bearing. This bearing is aligned with geographic true north on your map, which is not the same as the magnetic north your compass points to.
- Adjust for magnetic north declination. Every map will have the degree of declination listed near the north arrow, and this number is different in different places. To adjust the bearing you got from your map, add the degrees if the declination is to the west and subtract the degrees if the declination is to the east (here in Maine, you add 18°). This adjustment is the MAGNETIC NORTH bearing. When you navigate, use this bearing.
To determine distance
- Measure the distance using the string on your compass or a ruler
- Use the scale ruler on the map to determine the distance
- If you measured with a ruler, multiply by the scale; For example, let’s say 1 inch = 2 miles…so if you measured 1.25” that would be 1.25*2=2.5mi
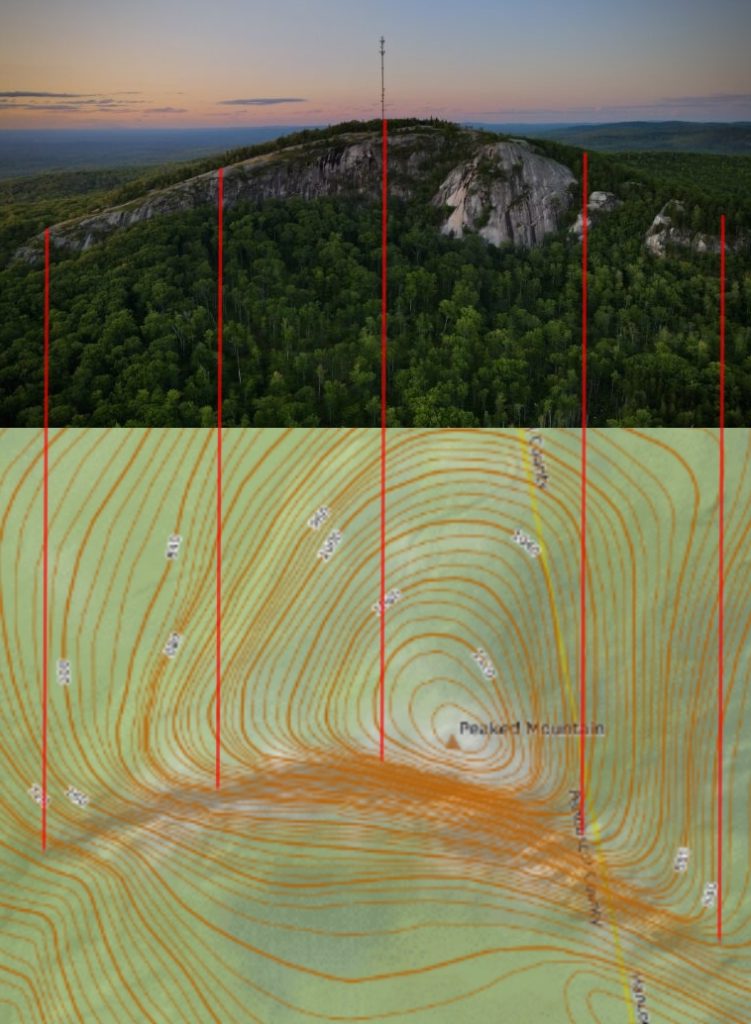
Thin lines on a contour map indicate the elevation and slope of the land.
Contour lines often have a number on them; that is the elevation. The vertical elevation change between every contour line on one map is the same, no matter the horizontal distance.
The closer two contour lines are to each other, the steeper the slope. The further they are from each other, the more gentle the slope.
A “V” in the contour line indicates a sharp direction change.
On the diagram below is a real-life picture of Chick Hill as well as the accompanying topographic map. The red lines in between show the connection between the two.
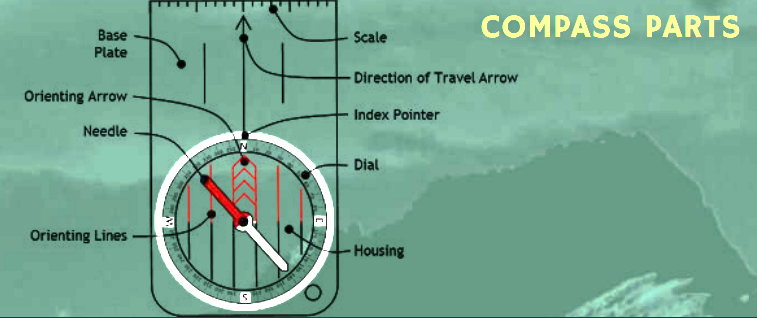
Parts of a compass
- baseplate: a clear plate that has at least one straight edge and a ruler for when you are using the compass with a map
- scale: there is a ruler at the end of the compass
- direction of travel arrow: this is the direction in which you point the compass when you take a bearing of an object
- magnetic needle: the red side of this needle always points to magnetic north
- orienting arrow: this arrow helps you orient the compass housing
- orienting lines: lines that are used along with the straight edge of the baseplate to help your compass point north on a map
- compass housing and dial: these make up the rotating circle known as the bezel of the compass used to take bearings
- index pointer: mark indicating the bearing degree
Magnetic north vs True north
- True north is the direction pointing to the geographic north pole
- Magnetic north is one of the poles of Earth’s magnetic field, which is constantly changing
- The red needle on your compass will always point to magnetic north, which varies from true north by the magnetic declination listed on each map
Orienting yourself
- It is easiest to take bearings in open spaces when possible
- As a guideline in the wilderness, the red needle on your compass will always face magnetic north
Find a bearing
- Locate a notable object in the distance
- Hold the compass in front of you so that the direction of travel arrow is pointing to that object
- Rotate the bezel so that the orienting arrow aligns with the magnetic needle
- Now the index pointer will mark the exact degree of the bearing between yourself and the object
- Move in the direction of the bearing to follow it
- Reorient yourself to new objects as necessary to continue moving in the direction you want to go
Red Fred in the Shed
- The steps to taking a bearing may be difficult, but just remember Red Fred in the Shed
- “Red Fred” is a nickname for the compass’ magnetic needle
- The “shed” is the orienting arrow
- Once Red Fred is in the Shed, you can look at the degree dial and read what your bearing is
Try it out!
- Find a nice open area, bring your compass, and pick an object
- Use your compass to try and take a bearing of that object in relation to you
- Follow that bearing to travel to the object
- Continue repeating this process to practice this skill
Start with what is around you immediately
- Observe your surroundings and consider what you already know
- If you have a map, do you know where you are on that map?
- Can you identify any large features on that map in the real world? Are they near you?
Use that information to your advantage
- Roughly estimate your point location (where you currently are on the map)
- Orient yourself to your cardinal directions using the features you’ve identified
Sometimes you can’t just use your surroundings – use other tools
- Other things like the sun and stars can be used to orient yourself to your cardinal directions
Use the sun
- The sun rises in the east and sets in the west
- In the northern hemisphere, the sun travels directly overhead in the summer and lower in the sky in the winter
- Based on the season and time of day, the sun can help you estimate your cardinal direcitons
Use the stars
- The North Star (Polaris) is the only star in the sky that stays in the same spot and has been used for travel since the beginning of time
- The North Star is the brightest star located at the end of the “handle” of the Little Dipper
- If you can identify the Big Dipper, the two stars at the end of its “cup” point to the bright North Star
- Once you’ve found the North Star, you are facing North
Use nature
- Moss and lichen typically grow on the north-facing side of trees and boulders
- In the Northern Hemisphere, trees generally have more branches and denser foliage on their south-facing side because it receives more sunlight than the north-facing side
Try it out!
- Next time you are out in the wilderness, try using your environment and these skills to figure out your cardinal directions
- Use either your phone or a compass to see how accurate you were