Maine Home Garden News — September, 2010
September is the month to . . .
By Richard Brzozowski, Extension Educator, Cumberland County, richard.brzozowski@maine.edu
- Continue to harvest produce from your garden. Select only unblemished produce for canning and freezing.
- Make note of annual plants that performed well for possible use next year.
- Be aware of weather changes and expected frosts. Frosts don’t typically occur on winding or cloudy nights.
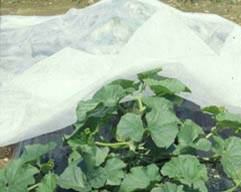 Gather materials for garden frost protection such as old bed sheets, drop cloths, plastic tarps, etc. Perhaps prepare framework out of metal hoops or wood over garden spaces to hold these sheets above the plants to allow for air insulation space and avoid damaging plants/fruit.
- Consider constructing a plastic covered hoop house over certain garden spaces such as tomatoes, peppers, squash, etc. The structure could be made of metal tubing, plastic conduit or wood. This type of season extension method could “buy” you 3-4 weeks of more growing.
- Visit your local garden center to shop for shade trees, ornamental shrubs and other perennials. Fall is an acceptable time to plant as fall rains are typical. Garden centers usually have sales to move product before winter sets in.
- Consider fertilizing your lawn for good growth next year.
- Get lawn or garden soil tested if you have not done so in a few years. Fall is a good time to spread lime as it takes 3-6 months to react chemically in the soil. A soil test will provide you with accurate information on how much lime is needed. To submit a soil sample: Maine Soil Testing Service.
- If garden expansion is on your mind, prepare new garden space by tilling, soil testing, and liming the area. If additional raised beds are a part of your plan for next year, build them this fall.
- Consider planting a winter cover crop on exposed garden spaces. Oats make a decent cover crop. Purchase a 50 lb. bag of whole oats (horse feed) for about $10.00 from your local farm/feed dealer. Sow the oats at a heavier rate as the month progresses. The oats will sprout and grow this fall and die at the first freeze, making a nice brown mat of dead stems and leaves. These will hold your top soil in place over the winter and can be easily tilled in next spring.
By Liz Stanley, Horticulture Program Coordinator, UMaine Extension, Knox, Lincoln & Waldo Counties, elizabeth.stanley@maine.edu
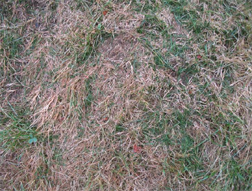
Do you have a section of unhealthy looking lawn? Late August into mid-September is a great time to renovate and over seed an area that’s sandy, compacted, worn, weedy or damaged by the hot, dry summer. Here are the basic steps:
- Test your soil to determine the pH, nutrient content and organic matter in your soil.
- Be sure the area gets at least 6 hours of sun.
- Mow the grass closer than you normally do.
- Rough up the soil and grass with a rake, tiller or core aerator (available at rental stores). This is easier to do if the soil is moist but not wet.
- Apply lime if needed, based on your soil test results.
- Spread 1/3″ to 1/2″ of finished compost over the area, raking it evenly. (Compost contains phosphorous, so skip adding more if recommended on the soil test results.)
- Choose seed that’s appropriate for your site. There are low maintenance mixes and endophyte-enhanced seeds which are resistant to pests and diseases. A small amount of perennial ryegrass will germinate quickly and keep soil in place while the other species grow. Dutch white clover is a good addition to most lawns because it helps fix nitrogen and adds diversity.
- Spread seed by hand or with a hand seeder.
- Roll or tamp the area for good seed-to-soil contact.
- Mulch with a light covering of straw.
- Water well (but be careful not to wash seeds away). Keep moist but not wet until germination. Water weekly until established.
-
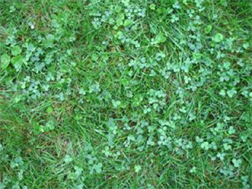
Lawn after renovation. Photo by Liz Stanley Mow if needed after grass is well established with a sharp blade and no shorter than 3″ high.
If your lawn is near a shoreline, use compost sparingly and mulch well to prevent phosphorous and nitrogen run off. (Better yet, plant trees and shrubs near the shore instead of grass.) For more information about lawn care and which grasses are best for your lawn see
- Establishing a Home Lawn, Bulletin #2637, UMaine Extension
- YardScaping, Maine.gov
- Grass Seed Mixes for Maine, Maine.gov
By Barbara Murphy, Extension Educator, Oxford County, barbara.murphy@maine.edu
 I like the idea of composting — taking materials that would otherwise go into landfills and turning them into something that could make my garden better. The problem is, I have never been very good at it. Having all of the necessary quantities of “green” and brown materials together at the same time was always a challenge. I’m not even going to mention getting the pile turned! In the end, my “compost” ended up looking like a overgrown weed pile. After some serious digging and poking, I could manage to find some dark colored material that I called compost, but it was hardly worth the effort.
After attending a two-day workshop on “composting at schools,” I have new energy and hope that I can join the ranks of successful composters! Bill Seekins, a faculty member of the Maine Compost Team, shared with the class how he composts his kitchen wastes at his own home. It is very simple and seems foolproof. So I am going to give it a try and fall is the perfect time to start.
The first thing you will need to do is amass a quantity of carbon material, the “browns.” With fall heading our way, fallen leaves are a perfect material for this use. Rake up and bag dry leaves and store them so they stay dry but are available for use.
Some sort of container is helpful at this point. It could be as simple as a circle of chicken wire or snow fence or as complex as a multiple-bin wooden structure. The only thing that matters is that the container is large enough to generate heat but not so large that it compresses the pile and is difficult to turn. For square bins, the suggested size is 3′ x 3′ x 3′; for fenced-in piles, shoot for a diameter of 6 feet.
Choose a well-drained, easily accessible site (you don’t want to walk too far in the middle of the winter). The amount of sun or shade hitting the pile isn’t critical, but some sun will move things along a bit more rapidly.
Fill the bin or enclosure with leaves — all the way to the top. When you are ready to add kitchen scraps, poke a hole into the center of the pile, pour in the scraps, mix it up a bit (30 seconds is good); close the hole with leaves and you are done. Choose a different location each time and make sure the material is mixed into the leaves. Over time, the leaf volume will shrink. When it is noticeable, just add more leaves from your reserve and carry on.
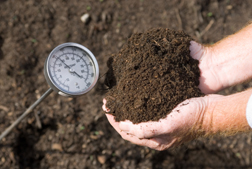
Eventually, the bin will be full and you will need to stop adding leaves and food. If you want to keep composting, you will need to start another bin. If the compost is not uniform throughout the bin, you can:
- Mix the material and let it finish composting
- Choose the darkest most composted material at the bottom of the pile and use that and return the rest to your new pile.
Compost should only be added lightly every year to well-established gardens; we were told it should be like “sprinkling pepper on mashed potatoes”!
For more information on backyard composting, see
- Home Composting, Bulletin #1143, UMaine Extension
- How Compost Happens, Bulletin #1159, UMaine Extension
- Composting to Reduce the Waste Stream: A Guide to Small Scale Food and Yard Waste Composting, NRAES
University of Maine Cooperative Extension’s Maine Home Garden News is designed to equip home gardeners with practical, timely information.
Let us know if you would like to be notified when new issues are posted. To receive e-mail notifications fill out our online form.
Maine Home Garden News was created in response to a continued increase in requests for information on gardening and includes timely and seasonal tips, as well as research-based articles on all aspects of gardening. Articles are written by UMaine Extension specialists, educators, and horticulture professionals, as well as Master Gardener Volunteers from around the state, with Professor Richard Brzozowski serving as editor.