Bulletin #2761, Container Gardening Series: Gardening in Small Spaces

Developed by Extension Specialists Richard E. Durham and Deborah B. Hill, University of Kentucky. Adapted for Maine by Associate Extension Professors Donna Coffin, Kathy Hopkins, and Frank Wertheim, and Extension Agriculture Coordinator Casey Bowie, The University of Maine. Reviewed by Associate Extension Professor Marjorie Peronto, The University of Maine.
Revised by Donna Coffin, Extension Professor, Pamela Hargest, Horticulture Professional and Kate Garland, Horticulture Professional, University of Maine Cooperative Extension.
For information about UMaine Extension programs and resources, visit extension.umaine.edu.
Find more of our publications and books at extension.umaine.edu/publications/.
Gardening, in one form or another, is often described as one of the most popular hobbies in the United States, and rightly so. Involvement by people in gardening activities helps promote healthy habits including:
- Exercise
- Healthy food
- Food safety & security
- Stress & anxiety reduction
So, most would agree that gardening is a worthwhile endeavor. However, when most people think of a garden, they imagine a large field that has been plowed with long, neat rows spaced 3 or 4 feet apart to allow cultivation by a tractor or tiller. Gardening on such a scale is impossible for city dwellers, considering that residential lot sizes continue to decrease and more and more people are choosing to live in townhomes, condominiums, or apartments.
Our modern landscapes have little enough room for outdoor leisure in general, not to mention gardening. Nevertheless, you would be surprised at the number of vegetables that can be produced in a very small area. A cherry tomato seedling project in Piscataquis County averaged over $9.50 worth of cherry tomatoes from each seedling. When gardening in a small space, there is little need for spacing plants in rows, so planting can be more efficient. Also, placing plants in a bed or container reduces the need to walk in or closely around your plants. This reduces the chance that soils will become compacted and need frequent tilling. And with a little planning, even residents of apartments and condominiums can grow vegetables on their patios. Raised-bed and container gardening may also allow those with limited mobility to garden.
This publication will outline three common methods for gardening in small spaces:
- Raised-bed gardening
- Square Foot Gardening
- Layer gardening
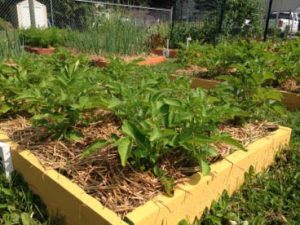
Raised-Bed Gardening
Raised-bed gardening has several advantages. Soils in raised beds are usually better drained than the surrounding area so installing raised beds offers a solution for poorly drained sites. Better root growth from improved soils usually results in higher yields from plants grown in raised beds. Raised beds require less stooping during weeding, watering, and other activities. Raised beds can also be installed in areas that are difficult to garden conventionally such as sites with shallow soil (over rock), steep slopes, or poor soil quality.
The garden beds are usually raised off the ground surface to a height of at least 6 to 8 inches. A frame to support the soil may be constructed from wood, stone, metal, concrete block or brick, or the gardener may prefer to simply mound the soil without a rigid structure. The bed size will vary according to the gardener’s needs and the space available. Beds are typically constructed no more than 4 feet wide since this width allows for an easy reach into the bed from either side. Maintain an aisle of 2 to 4 feet between beds to allow easy access with tools and equipment (wheelbarrows, hose reels, chairs or stools, wheelchairs).
Treated and Natural Wood
The use of treated wood in gardening situations is quite controversial. The advantage of treated wood is that it resists decay and insect activity for many years and so is a more permanent addition to the landscape than most untreated woods. Prior to 2004, the primary wood treatment involved chromated copper arsenate (CCA). While this product was approved for use in landscape situations, the use of CCA-treated wood was phased out in 2004. Before using treated wood in raised-bed gardening, obtain a product data-sheet regarding the type of wood treatment used and limitations to the use of such wood in the landscape. The gardener may also wish to contact the Environmental Protection Agency for current information regarding the safety of wood treatments. Alternatives to treated wood include the use of woods naturally resistant to decay (cedar, hemlock, redwood, and black locust), synthetic products (TREX, recycled plastics), rock, metal, or masonry block. Rough hemlock tends to be the most economical and readily available wood for raised beds in Maine, 2-inch thick boards will last up to 8 years before they need to be replaced. All of these provide sturdy structures that should persist for some time in the landscape. One could also choose to use another type of untreated wood with the understanding that it must be replaced in two to three years.
Selecting a site
Vegetable gardens will be most productive when planted in full sun. However, many vegetables will thrive and produce a good crop if they receive 4 to 6 hours of direct sunlight a day.
Locate the garden away from trees if possible so that tree roots will not compete with the vegetables for water and nutrients. It is especially important that gardens not be located close to black walnut (Juglans nigra) trees since walnuts produce a compound in their roots, shoots, and leaves that are toxic to many plants including several vegetables. Locate your beds in a location where water is readily available since raised beds will dry out more quickly and require more frequent watering than conventional gardens. A 100-square-foot garden requires at least 60 gallons of water a week. It will be easier to provide water from a hose and trickle irrigation on a timer will make watering the garden very convenient.
| Partial sun (4–6 hours per day)* | |
|---|---|
| Beets | Onion |
| Carrots | Parsley |
| Cauliflower | Peas |
| Swiss chard | Radishes |
| Cucumber | Spinach |
| Lettuce | Winter Squash |
| *Although these vegetables will grow in partial sun, best yields will be realized in full sun. | |
| Full sun (over 6 hours per day) | |
| Beans | Eggplant |
| Broccoli | Melons |
| Cabbage | Summer squash |
| Corn | Tomatoes |
Preparing the soil
One of the reasons that raised bed gardening is so productive is that the gardener has control over the soil used in the bed. In traditional in-ground gardens, the soil becomes compacted from tractors, tillers, or people moving across the surface. Adding components such as organic matter and porous material to raised beds will improve soil structure (see below for directions on making your own compost – it will ultimately save you time and money, and it recycles things and keeps them out of our landfills!).
Soil compaction is also avoided by not walking in the beds. An ideal soil for raised beds would consist of equal volumes of garden soil, organic matter (compost, coconut coir, composted manure), and porous material (vermiculite or perlite). If good quality garden soil is not available, substitute additional organic matter. Add lime and fertilizer, as recommended by a soil test of the finished soil mix or in-ground garden. In the absence of a soil test, 1 to 2 pounds of a complete fertilizer such as 10-10-10 per 100 square feet or a similar amount from an organic fertilizer, is usually adequate.
Planting
There are several ways to plant your bed. You may also choose to plant in rows within the bed, or simply group similar plants together by maturation time or height. When choosing what to plant, keep in mind that diversity in plants will promote a more stable ecosystem. Plant diversity tends to encourage more beneficial insects and microorganisms in the planting area. Monoculture, or grouping together of the same or closely related crops, may encourage more pest and disease issues. You may even want to include a few flowers such as nasturtium, marigolds, calendula, cilantro, dill, or borage in your vegetable garden to increase the diversity of plants being grown and attract pollinators.
Also, have a plan for intensively gardening the space. Remember that certain vegetables like spinach, lettuce, cabbage, broccoli, and others, grow well in spring and can be planted relatively early (late March or early April). These crops are often harvested by mid-May when summer vegetables (tomatoes, beans, peppers, squash, etc.) are planted. Some of these crops mature very quickly and it may be possible to make two or more plantings in the summer garden. For example, beans planted in mid-May will very likely mature by mid-July. A second planting of beans can be made in mid-July to be harvested in mid-September.
Many summer vegetables will be finished by late August to early September, just in time for the planting of fall vegetables (many of the same crops that were grown in the spring garden). By preparing for three gardening seasons (spring, summer, and fall) and planting in succession (one crop goes in as another is harvested), the most intensive and efficient use of your garden space will be achieved. Of course, when growing successive plantings like this, much attention needs to be paid to soil fertility throughout the growing season.
Another way to garden intensively is to grow plants vertically when possible. This saves space and often results in higher-quality produce. Tomatoes should be staked or caged to support vertical growth. Vine crops such as cucumber, squash, or even melons can be trained to a trellis rather than allowing them to sprawl across the ground. In the case of melons and squash that have large fruit, individual fruit may need to be supported by a sling of plastic mesh or nylon hose.
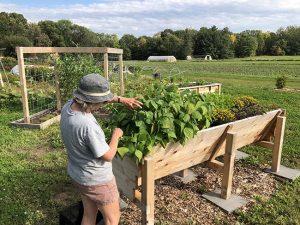
-

- Corn and vine crops planted in a raised bed.
-
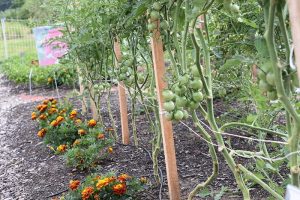
- Staked tomatoes.
Care and maintenance
One of the benefits of raised beds is that the plants have been elevated above the walkway and less stooping will be required for maintenance and harvest of vegetables. However, because the soil is raised, it tends to drain faster and may dry out more rapidly than conventional gardens. One way to slow soil drying is to mulch. Applying mulch is one of the best things you can do for your garden. A light layer of mulch helps preserve soil moisture, so a raised bed or container loses less water by evaporation. Mulch reduces weeds, helps maintain a more even soil temperature and helps keep fruits and vegetables clean. Keep the mulch at least an inch away from the stems and crowns of plants to discourage disease. Organic mulches can improve the soil, and nonorganic mulches such as white marble chips can reflect light into the plant canopy in low light situations.
Remove any weeds and apply a few layers of newspaper beneath organic mulch to help prevent weed germination. Apply 1 to 3 inches of compost, chopped leaves, loose grass clippings, pine straw, bark mulch, or similar material. Do not use any materials that have a sour or acidic smell. This smell indicates that anaerobic decomposition has begun, the byproducts of which can harm your plants. If an organic mulch begins to decay, it may temporarily deplete nitrogen from the soil which may require additional fertilizer applications.
Plastic film, usually black, is the most common type of inorganic mulch. The film is stretched over the bed in early spring, after the soil has been prepared, and anchored along the sides. Holes are made in the film where seeds or transplants will be placed. These holes will also provide entry sites for additional water during the growing season and allow for sufficient air exchange in the soil. Soaker hose or drip irrigation lines may be installed under the plastic to allow routine irrigation or supplemental irrigation during drought. Black plastic film will prevent weed growth by blocking sunlight, significantly reduce evaporation of moisture from the soil surface, and will also promote warmer soil temperatures in spring, which will hasten the development of most vegetable crops. The plastic film is usually replaced after each growing season. Application of supplemental organic matter is more crucial with inorganic mulch than with the use of organic mulch. An added benefit of mulch (either organic or inorganic) is that the produce is usually cleaner at harvest.
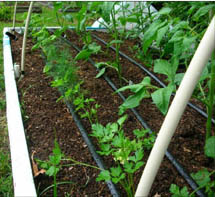
As mentioned earlier, raised beds are more prone to drying out than conventional gardens. At least 1-¼ to 1 ½ inches of rainfall or supplemental irrigation per week will usually be necessary to mature a vegetable crop. If supplemental irrigation is applied, it is best to use drip or soaker hose irrigation since these tend to direct water to the root system and not onto the plant itself. Watering the entire plant, especially late in the evening, will allow water to remain on the foliage for several hours. In certain instances, this may promote disease problems. Therefore, it is best to water in the morning if it is necessary to use some type of sprinkler that wets the entire plant.
Season extenders
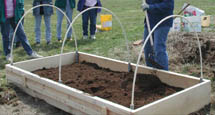
As spring approaches, many of us will want to start work in our vegetable gardens. And who wouldn’t want to get a jump on spring and have the first ripe tomato in the neighborhood? Or on the flip side of the coin, what if you could extend the growing season and produce leafy greens like spinach and lettuce well into the fall and winter? Row covers may allow you to do either or both.
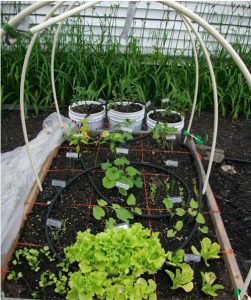
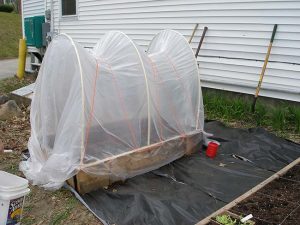
Row covers, or low tunnels as they may be referred to by commercial growers, are either made of clear plastic film that is supported by wire/pvc hoops, or floating row covers made of spun bond fiber that lay on top of the crop. Floating row covers can give 2°F to 4°F of frost protection, and have the extra advantage of being permeable to rain. The covers run the length of the row and are covered on the sides by soil. The ends are often attached to a wooden frame to allow opening of the ends on warm, sunny days. The clear plastic covers usually stand 18 to 24 inches tall. Commercial growers use another version of this technology called high tunnels, which are large enough to walk under.
The advantage of row covers is that they protect plants from frost. On cool nights the warm soil radiates heat that is trapped by the covering and so offers the plants some protection from cold temperatures. Cold-sensitive plants such as tomatoes and peppers can be transplanted to the garden 3 to 4 weeks earlier when using row covers. Once warm temperatures prevail, remove the covers and grow the plants normally. Cold-tolerant plants, such as spinach, make a great fall and winter crop under row covers and can be grown nearly all winter long.
Another advantage is that plants grown under row covers often have fewer insect problems. However, on warm days, temperatures under the row covers can become quite hot, to the extent that plant damage may occur. If warm, sunny conditions are expected, open the ends of the row covers to allow some ventilation, then close them again at night to conserve heat.
One problem people encounter with row covers is that weeds like them as well. When you consider that the covers are in place for 3 to 4 weeks and that little cultivation can be done during this time, it’s easy to see why weeds may become a problem. One solution is to put black plastic sheeting on the soil before planting. Make holes only large enough to insert your transplants in the black plastic, and cover the remainder of the area with the plastic to suppress weed growth. The black plastic will also help to conserve soil moisture and will trap more of the sun’s energy to warm the soil and provide heat to the plants on cold nights. When the row covers are removed, the plastic weed barrier is usually left in place to give season-long weed control.
Plans for building a raised bed: diagram and materials list ( Word | PDF )
Layer Gardening
Many would-be gardeners find that their soils are too wet, too stony, or too poorly drained to grow a good garden. Instead of taking years to try to improve the native soil, another option is to build garden beds on top of your native soil. There are several methods that gardeners can use.
Most methods start with a weed-block material: layers of wet newspaper and cardboard. Newspaper and cardboard give the advantage of breaking down so future tillage in the bed will be easier.
On top of the weed-block material add a deep, alternating layer (12 to 18 inches) of weed-free growing material. Compost, chopped leaves, grass clippings, etc., layered or mixed with peat moss, produces a garden that holds moisture yet drains well, provides nutrients, and limits weed competition.
Square Foot Gardening
Square Foot GardeningTM, developed by Mel Bartholomew, is a special type of raised-bed gardening. The bed is divided into one-square-foot grids, with each grid planted with a defined number of transplants or seeds depending on what crop is being grown. The square-foot approach also emphasizes the use of recycled materials for bed construction and relies heavily on compost as a major component of the growing medium. The use of synthetic fertilizers and pesticides is discouraged in Square Foot Gardening. Because of the emphasis on compost and other organic materials in the growing medium, supplemental fertilizer may be unnecessary in Square Foot Gardening.
Constructing boxes
A Square Foot Garden is usually 4 feet by 4 feet and provides 16 individual square foot areas for planting your vegetables, herbs, and flowers. Find 4 recycled (but not pressure treated) boards that are 1 inch thick, 6 inches wide, and 4 feet long. Drill holes in the ends and sides so that you will be able to screw the boards together to form a box. Use 3-inch screws to hold the boards together. Depending on how much space you have to use, or whether you would like your children to have their own gardens, you can also make square-foot gardens that are 3 feet x 3 feet or 2 feet x 2 feet. The size is dependent on whatever distance is comfortable for you to reach across from any side to tend the garden—smaller sizes for smaller people.
If you are going to place your Square Foot Garden on the grass or on an old garden plot, place newspapers or corrugated cardboard on the bottom to form a floor. The newspapers should be several layers thick, placed with edges overlapping by about a third. Cardboard is a single layer, but also overlapping by about a third. Once you have formed the floor for the garden, soak it thoroughly with water, so the papers or cardboard become soggy.
If you are going to place your Square Foot Garden on concrete or asphalt or another solid surface, use a single sheet of 3/4-inch plywood for the base, and screw the plywood onto the frame. You also need to drill a few evenly spaced drainage holes (4 to 6) in the plywood base.
Soil mix
The soil mix for a Square Foot Garden is equal volumes of peat moss, coarse vermiculite, and compost (Bartholomew recommends five different types of compost). A 4 x 4 square foot garden will require 8 cubic feet of the mix. A more sustainable option than peat moss is coir and it often comes in compressed bricks, loose bags, or bales which can be rehydrated by submerging in water. Big bags of coarse vermiculite come in 2 or 3 cubic feet sizes. Mix the three in a wheelbarrow or other big container or tarp and fill the box up to the edges. This mix is high in nutrients because of the compost, and is very loose and friable, making it easy for plant roots to grow and obtain all the nutrients and water that they need. Both the coir and the vermiculite help to hold water in the soil for the use of the plants.
Grid
Now you need to mark off your squares. There are 16 squares in a 4 x 4-foot garden. Use either nail with twine or string to mark off the squares, or, for a more permanent grid, use narrow wooden laths or recycled 4-foot Venetian blind slats. If you are using a more permanent grid, the ends of the grid sections should also be screwed to the boards that edge the garden.
Planting
When planting your Square Foot Garden, you may use either bedding plants or seeds. This kind of garden is very conservative of seeds, as you will be placing the seeds or plants in the final spacing recommended for each type of plant on its seed packet, rather than the direct-seeding spacing. For each square foot, you will plant either 1, 4, 9, or 16 plants. The squares with only a single plant have plants that are usually grown one foot apart, like tomatoes or cabbage. The squares with 4 plants have plants that are usually planted 6 inches apart, like chard or lettuce. The squares with 9 plants have plants that normally need to be 4 inches apart, like beets or spinach. And the squares with 16 plants have plants that normally need to be only 3 inches apart, like radishes or carrots.
To emphasize diversity and get the most from your garden, plant different things in each square — some can be reserved for flowers (most flowers end up in the 4 per square category). If you want to grow things that form vines, like cucumbers or squashes (usually 1 per square), put them on the north side of your garden (so they won’t shade the others), and use poles or electric conduit, or PVC pipe to make a trellis for them to climb. You can use chicken wire or other mesh products (like deer fencing or bird netting) across the uprights to give the climbers lots of places to wind their tendrils.
When using seeds, pour only a few from the packet into your hand and then place only one or two seeds in each hole. If you keep your leftover seeds in a cool and dry place, many of them will survive to make new plants for you for several planting seasons. When using bedding plants, make a shallow, saucer-shaped depression where the plant will be placed. This will help direct water to the root system.
Some of the things you will plant grow very quickly and will be harvested in a month or so. There are three major types of plants that you will have in your garden: those from which we eat the root (carrots, beets, parsnips, radishes), those whose leaves we eat (lettuces, chard, spinach, cabbage), and those that produce edible fruits (tomatoes, beans, peas, squashes). When you harvest something from one of these categories (for example, radishes, from the root category), replace it with something from one of the other two categories (such as spinach from the leaf category, or beans from the fruit category). If you start in the spring, you might be able to grow all three types in each square over the whole growing season.
Each time you make a change in a Square Foot Garden, add another trowel full of compost and mix it into the soil in that square before replanting or reseeding. This addition of compost will resupply the growing medium with nutrients.
These gardens are so small that it is easy to protect them, whether with garden fabric to protect against too much sun, with chicken wire or netting to protect from insects and animals or with something like the row covers to extend the growing season. You can make your own cover supports with bent wire hangers, to cover the whole garden or only a single square.
Themes
One thing that is fun about a Square Foot Garden is that you can design it any way you want. So if you want a pizza garden, for example, you might want to be growing onions, green peppers, banana peppers, tomatoes, parsley, basil, and oregano. If you wanted a salad garden, you might want to grow green peppers, cucumbers, spinach, cherry tomatoes, and several varieties of lettuce. Use your imagination and enjoy!
Summary
Gardening is one of the most popular activities for people around the world. The benefit of providing food, herbs, and flowers for the table and enjoyment only adds to its popularity. Focusing on the small scale and adaptability of these small-space gardens shows you that almost anyone can grow some kind of garden. People of different sizes, people with different experiences in growing things, people with disabilities, older and younger people—all can manage some kind of garden. Just decide which kind you want and design it so that the gardener will be able to work in it. Have teenagers build gardens for elderly people to manage. Grow gardens with lots of scents and textures for the visually impaired. Build gardens up on tables or sawhorses so that wheelchairs will fit underneath. Get out in the sunshine and GROW!
| 1 plant per square foot (spaced 1 to 1 1/2 feet apart in conventional gardens) To plant one per square, simply make a hole with your fingertip in the center of the square and place the seed or bedding plant right there (bedding plants should be planted into a small saucer-shaped depression in the soil). | ||
|---|---|---|
| Roots/Tubers | Leaf Crops | Fruit/Legumes |
|
Potatoes Sweet Potatoes Horseradish |
Broccoli Kale Collards Cabbage |
Melons Cucumbers Tomatoes Artichokes Eggplant Squash Okra Peppers Pumpkins |
| 4 per square foot (spaced 6 inches apart in conventional gardens) To plant four per square, draw a line from top to bottom of the square with your fingertip, halfway across the square; then draw a second line from side to side, halfway across the square, so you have made a big cross (like the Red Cross cross) in your square. Then make a hole with your fingertip in the center of each of the little squares and put the seed or plant in those holes. | ||
| Herbs | Leaf Crops | Fruit/Legumes |
|
Parsley Cilantro Basil Oregano Mint |
Bok choy Lettuce Chard/Swiss Chard |
Soybeans Fava beans Drying beans Com Strawberries |
| 9 per square foot (spaced 4 inches apart in conventional gardens) To plant nine per square, use your index and baby fingers to draw two lines from top to bottom and from side to side, giving you a grid like a tic-tac-toe game. Make a hole in the center of each of these little squares and put the seed or plant in them. | ||
| Roots/Tubers | ||
|
Beets Turnips Garlic |
||
| 16 per square foot (spaced 3 inches apart in conventional gardens)To plant sixteen per square, start with the grid you did for four, then use your index and second finger to make four holes in each of the four sections, and plant your seed or plant in each of them. | ||
| Roots/Tubers | Leaf Crops | Fruit/Legumes |
|
Carrots Radishes Onions Green onions |
Spinach |
String beans Peas |
For more information
The following bulletins are available through University of Maine’s Cooperative Extension Publications Catalog or your county Extension office.
For information on:
Specific Vegetable Crops, see:
- Bulletin #2190, Vegetable Varieties for Maine Gardens
- Bulletin #2282, Smart Gardener: A Learning Guide for Home Vegetable Growers
- Bulletin #2078, Home Vegetable Gardening
- Bulletin #2762, Growing Vegetables in Container Gardens
Building Your Own Raised Bed Frame, see:
Specific Needs of Individual Crops, see:
- Bulletin #2078, Home Vegetable Gardening
- Bulletin #2282, Smart Gardener: A Learning Guide for Home Vegetable Growers
Irrigation, see:
Composting and Using Manure in the Garden, see:
- Bulletin #1143, Home Composting
- Bulletin #1159, How Compost Happens
- Bulletin #2510, Guidelines for Using Manure on Vegetable Gardens
References
Durham, R. E. and D. B. Hill. Gardening in Small Spaces. Lexington: University of Kentucky Cooperative Extension Service
Bartholomew, M. All New Square Foot Gardening: Grow More in Less Space! Franklin: Cool Springs Press, 2005.
Bartholomew, M. All New Square Foot Gardening website www.squarefootgardening.com/
Information in this publication is provided purely for educational purposes. No responsibility is assumed for any problems associated with the use of products or services mentioned. No endorsement of products or companies is intended, nor is criticism of unnamed products or companies implied.
© 2009, 2023
Call 800.287.0274 (in Maine), or 207.581.3188, for information on publications and program offerings from University of Maine Cooperative Extension, or visit extension.umaine.edu.
In complying with the letter and spirit of applicable laws and pursuing its own goals of diversity, the University of Maine System does not discriminate on the grounds of race, color, religion, sex, sexual orientation, transgender status, gender, gender identity or expression, ethnicity, national origin, citizenship status, familial status, ancestry, age, disability physical or mental, genetic information, or veterans or military status in employment, education, and all other programs and activities. The University provides reasonable accommodations to qualified individuals with disabilities upon request. The following person has been designated to handle inquiries regarding non-discrimination policies: Director of Equal Opportunity, 101 Boudreau Hall, University of Maine, Orono, ME 04469-5754, 207.581.1226, TTY 711 (Maine Relay System).