Bulletin #7214, Maine Home Energy: Insulated Interior Window Treatments and Coverings

Prepared by Extension Professor Donna Coffin, University of Maine Cooperative Extension. Reviewed by Extension Professor Kathy Hopkins, University of Maine Cooperative Extension.
For information about UMaine Extension programs and resources, visit extension.umaine.edu.
Find more of our publications and books at extension.umaine.edu/publications/.
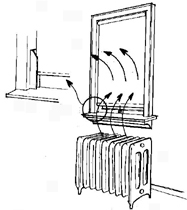
In winter, windows are a major source of heat loss in most homes, but they provide much-needed light and views of the outside. Without them you would feel like you were living in a cave. South-facing windows can actually be a source of heat during sunny winter days. But at night or on overcast days, adding insulation to your windows will reduce heat loss. There are a number of window coverings that can do this, including roller shades, draperies, insulated roman shades, thermal shutters, and insulated panels.
First, be sure that your windows are in good repair, with no cracks or missing glazing. Apply weather stripping to seal any gaps between the window and the window frame. We recommend that during the winter, you close insulative window coverings at night and on cloudy days. However you should open those on south-facing windows for solar gain on sunny days.
Here are several window treatments that you can make and attach to your windows. Keep in mind that to be effective, window treatments need to trap and hold air between the treatment and the window.
Roller shade
Conventional purchased roller shades, mounted inside window frames with no more than a quarter-inch gap at the sides, provide some insulative benefit. Make sure that the shade touches the window sill when pulled down. Side tracks or clamps made with molding and spring hinges installed on the sides of the windows will ensure a tighter fit.
Comment: More energy-efficient roller shades with reflective coating are available.
R-value: 1.3 to 2.2
Cost per square foot: $0.10
Payback period: 1 year
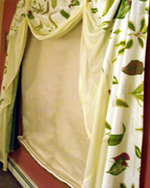
Draperies
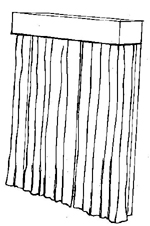
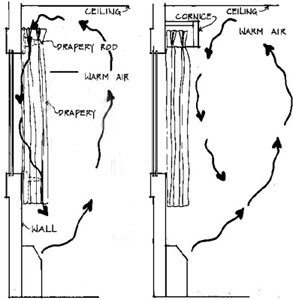
You can make conventional draperies more energy efficient by installing closed cornices over the tops of the draperies. Cornices—rigid “hoods” of wood or metal often used to hide drapery hardware—prevent air from moving by convection through the “tunnel” between the draperies and the window. To further reduce heat loss by convection, seal the sides of the draperies, allow the draperies to touch the sill or floor, and allow draperies to overlap by at least four inches in the center when closed.
Comment: The method of installation is more important than the fabric, although the fabric must have low air permeability, meaning that little or no air can pass through it. We recommend a separate lining, which will incorporate a layer of air that adds some insulative value.
R-value: 1.3
Cost per square foot: $0.10 for cornice only to $0.40 or more for cornice and drapery (depending on fabric)
Payback period: 1 to 2 years
Insulated Roman shade I—friction fit
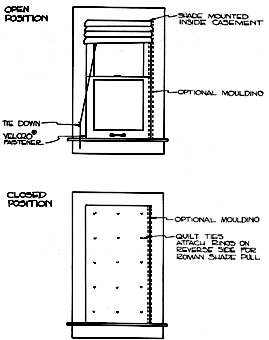
A Roman shade is a fabric window shade that folds into horizontal pleats when opened. Columns of small plastic rings attached to the window side of the shade channel cords to the top of the shade. The cords are then threaded sideways through screw eyes mounted on the window frame.
To make insulated Roman shades, add layers of fiberfill and a vapor barrier (plastic sheeting) between your outer fabric and lining fabric. Sew three or four columns of small plastic rings to the window side of the shade, using sturdy quilting ties to hold the layers and rings together. Attach a cord about twice as long as the shade to each bottom-most ring and thread it up through rings above.
The cross-sectional diagram of “insulated Roman shade I” below shows the relationship of the various layers of the curtain. The inner and outer fabrics are cut wider than the fiberfill so that they can be tucked against theside window jamb. The fiberfill is cut a half-inch wider than the window frame, so it fits snugly. You can use from one to three layers of fiberfill depending on the desired R-value.
You can also buy prelayered fabric designed for insulated shades, which includes water-resistant liner, fiber, vapor barrier, and metalized film quilted together.
Insulated Roman shade I—cross section from top
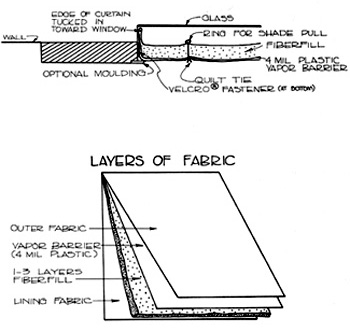
You can staple the shade to a narrow board and mount it inside the window frame at the top of the window, or use tacks, heavy-duty staples, or Velcro-style hook-and-loop tape to attach the shade to the window frame. Inside of the top window casement, mount a screw eye at the top of each column of rings. Thread the cords from the rings through the screw eyes to the side of the window.
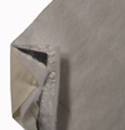
Note that when shade is down, the sides of the shade are tucked back toward the glass, then held in place with a hook-and-loop fastener at the bottom. This makes a seal with no visible gaps. A tab and hook arrangement could also work.
The optional molding becomes more necessary if the window frame is not very deep. The tab and hook closure seems to work best when the molding is used.
Comments: Various types of fiberfill can be used in this design, with varying R-values and initial costs. This is a very adaptable window covering that fits most any situation.
R-value (including covering and air spaces):
- With one layer of fiberfill—2.5
- With two layers—4.0
- With three layers—5.5
- Using prelayered fabric—7
Cost per square foot: $1.00–$1.50 (depending on fabric and the number of layers of fiberfill) for manually layered fabric; $2.50 for prelayered fabric and associated hardware.
Payback period:
- With one layer of fiberfill—3.0 to 5.5 years
- With two layers—3.0 to 5.0 years
- With three layers—3.0 to 5.0 years
- Using prelayered fabric—less than 1 year
Insulated Roman shade II—hinged clamp at sides
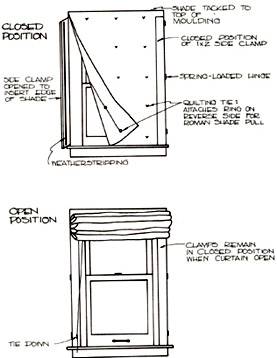
This shade is assembled with the same layers, quilting, and ring and string assembly as the Roman shade I. Because of the way it is anchored over the window frame at the top, this shade could be rolled instead of pulled. To roll, start at the lower edge of the shade and roll jelly-roll style until it is at the top of the frame. Ties attached to the window casing are used to secure the shade to the top of the window. The advantage of this shade is that because it is mounted above the window frame, it covers less of the window area when in the open position. It also requires less construction time as the quilting and rings are unnecessary.

Comments: Spring-loaded, hinged clamps (made of narrow pieces of wood or molding) produce a much tighter seal at the sides. This design requires molding around the windows to attach the spring-loaded hinged clamps; however, some modification (i.e., different types of hinges) may make it adaptable to windows without molding.
R-Value (including covering and air space):
- With one layer of fiberfill—2.5
- With two layers—4.0
- With three layers—5.5
Cost per square foot: $1.00–$1.50 (depending on fabric and number of layers of fiberfill)
Payback period:
- With one layer of fiberfill—3.0 to 5.5 years
- With two layers—3.0 to 5.0 years
- With three layers—3.0 to 5.0 years
Clip-on insulation board
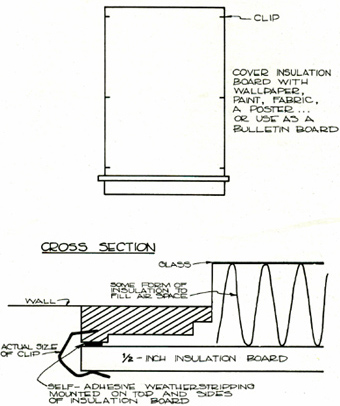
A simple piece of rigid foam insulation, with self-adhesive weather stripping at the top and edges, makes an easy and effective window insulator. It can be held in place with clips made from commercially available curtain hooks.
Drill small holes into the outside of the window frame at six locations around the sides of the window. Bend the curtain hooks to accommodate the width of the insulation board, and push them into the holes. These clips are easily removed to release the insulation board.
You can use the board and clips alone on most windows. But on north-facing windows where the heat loss is greater than the solar gain, we advise adding a fiberglass batt, a bag of cellulose, or crumpled-up newspaper between the board and the window to fill the air space.
Comment: This is our most effective energy-saving window covering. It is harder to remove on a daily basis; thus we recommend it for use in north windows for the duration of the heating season.
R-Value: Covering and insulation to fill air space: 11.5
Cost per square foot: $.40
Payback period: one year
Interior storm windows can reduce heat loss. If you have carpentry skills, you can build your own wooden window frame, cover with plastic, and insert in your existing window (Building Interior Window Insulation Panels by Guy Marsden from Art Tec). Or you can use the interior framing window strips with self stick channels and press in retainer splines to hold the plastic (i.e., Thermwell-Frost King Framing Strips).
Adapted with permission from Mark Piece, “Energy Saving Window Treatments,” Housing Fact Sheets, (Ithaca: Cornell University, 2000) and Nancy Korda and Susan Kummer, What About Windows? A Report on Thermal Window Coverings (Wisconsin Energy Extension Service, 1978).
Photos by Donna Coffin.
Information in this publication is provided purely for educational purposes. No responsibility is assumed for any problems associated with the use of products or services mentioned. No endorsement of products or companies is intended, nor is criticism of unnamed products or companies implied.
© 2009, 2012
Call 800.287.0274 (in Maine), or 207.581.3188, for information on publications and program offerings from University of Maine Cooperative Extension, or visit extension.umaine.edu.
The University of Maine is an EEO/AA employer, and does not discriminate on the grounds of race, color, religion, sex, sexual orientation, transgender status, gender expression, national origin, citizenship status, age, disability, genetic information or veteran’s status in employment, education, and all other programs and activities. The following person has been designated to handle inquiries regarding non-discrimination policies: Sarah E. Harebo, Director of Equal Opportunity, 101 North Stevens Hall, University of Maine, Orono, ME 04469-5754, 207.581.1226, TTY 711 (Maine Relay System).